
| This post originally appeared on the Decodable blog. |
In my last blog post I looked at why you might need CDC. In this post I’m going to put it into practice with probably the most common use case—extracting data from an operational transactional database to store somewhere else for analytics. I’m going to show Postgres to Snowflake, but the pattern is the same for pretty much any combination, such as MySQL to BigQuery, SQL Server to Redshift, and so on.
The data is a set of tables that take inspiration from Gunnar’s recent article about the Outbox pattern . We’re developing systems for a pet-grooming company, Oh-My-Dawg. But in this version of the cat-cleaning, guinea pig-grooming universe, we went with a monolithic application with all the data held on a single Postgres instance.
We’ve got a set of transaction tables in Postgres:

Customers have pets, pets need grooming and so they have appointments, and finally appointments are for pets and their owners. A straightforward data model, perfect for a transactional system. But for analytics, we don’t want to query it in place. Not only is querying the production database a bit of a no-no (for reasons including security of access and performance), it turns out that Oh-My-Dawg is a subsidiary of a larger pet care company which means analytics are done centrally on the Snowflake data warehouse platform.
So how do we get the data out of Postgres and over to Snowflake? We want it to be:
-
Easy—we’ve got better things to do than mess about with complex tools and pipelines (however much fun they might be)
-
Low impact on the source
-
Low latency
This is where Decodable comes in. The Postgres CDC source connector (built on the industry-standard Debezium ) captures changes to the source tables as they happen and writes them to Snowflake using the (guess what) Snowflake sink connector .
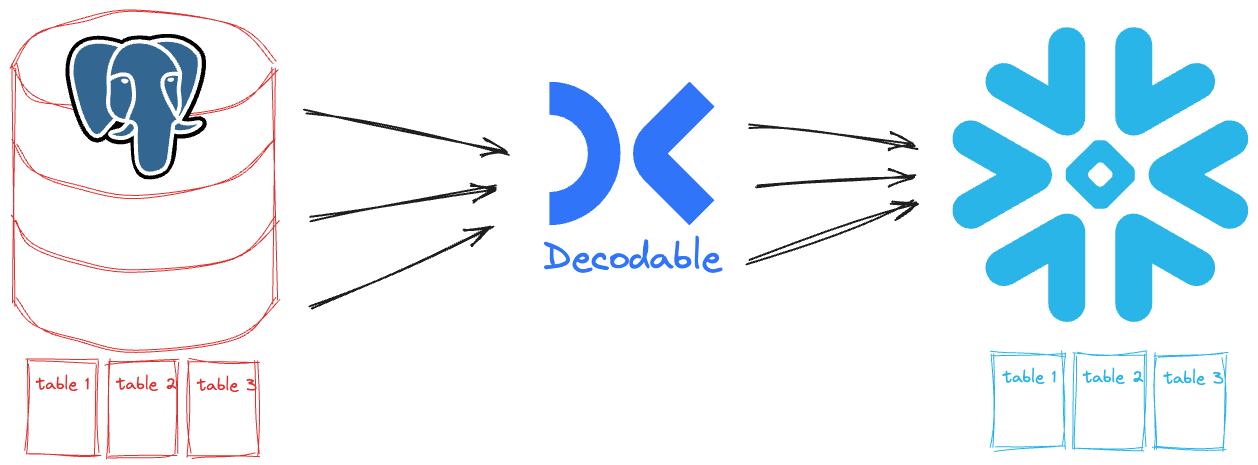
My Postgres database exists already, as does my Snowflake one. All we need to do in Decodable is connect them together. I want to show you two different ways you can do this, with the same end result. The first is point & click in the web interface, and the second is using our YAML-based declarative interface. As I said, the end result is the same, but you get to choose your own adventure.
Let’s start off with the visual approach since this also gives you a clear idea of what components we’re building with. In this post I’m going to give you an overview of what’s involved in building the pipelines. For a hands-on guide, sign up today and try out the quickstart .
Getting data out of Postgres with CDC 🔗
For CDC to work, the Postgres tables need to have replica identity set to FULL.
This is so that the complete (i.e., the FULL) contents of the row are captured for each change.
Let’s go ahead and do this from the Postgres SQL prompt:
ALTER TABLE customers REPLICA IDENTITY FULL;
ALTER TABLE pets REPLICA IDENTITY FULL;
ALTER TABLE appointments REPLICA IDENTITY FULL;
We’ll check it worked too—relreplident should be f (i.e., “full”):
SELECT oid::regclass, relreplident FROM pg_class
 WHERE oid in ( 'customers'::regclass, 'pets'::regclass, 'appointments'::regclass);
oid | relreplident
--------------+--------------
customers | f
pets | f
appointments | f
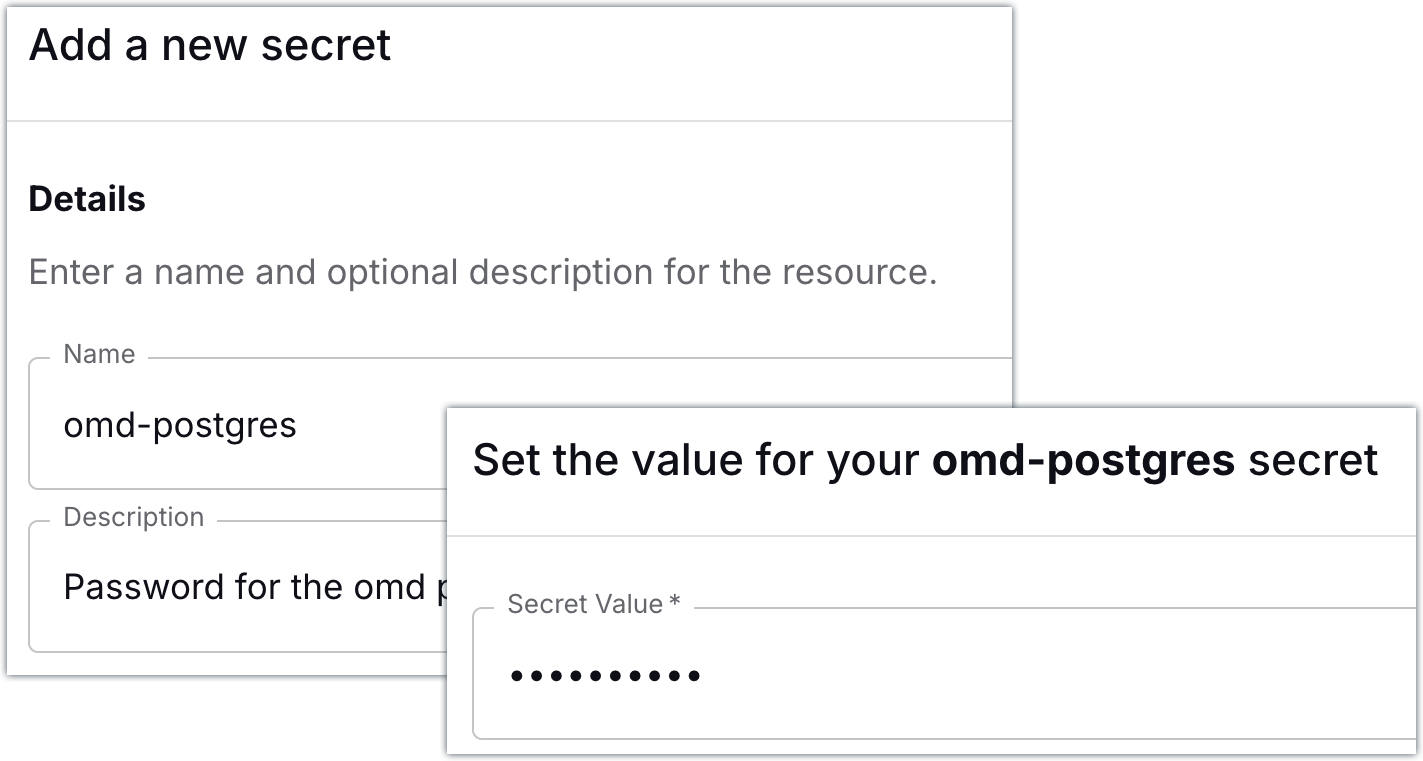
(3 rows)Now to connect Decodable to Postgres. In order for Decodable to authenticate to Postgres, it’ll need the user’s password. Decodable treats authentication credentials as first-class resources called secrets , so let’s add a secret that holds the Postgres user’s password:
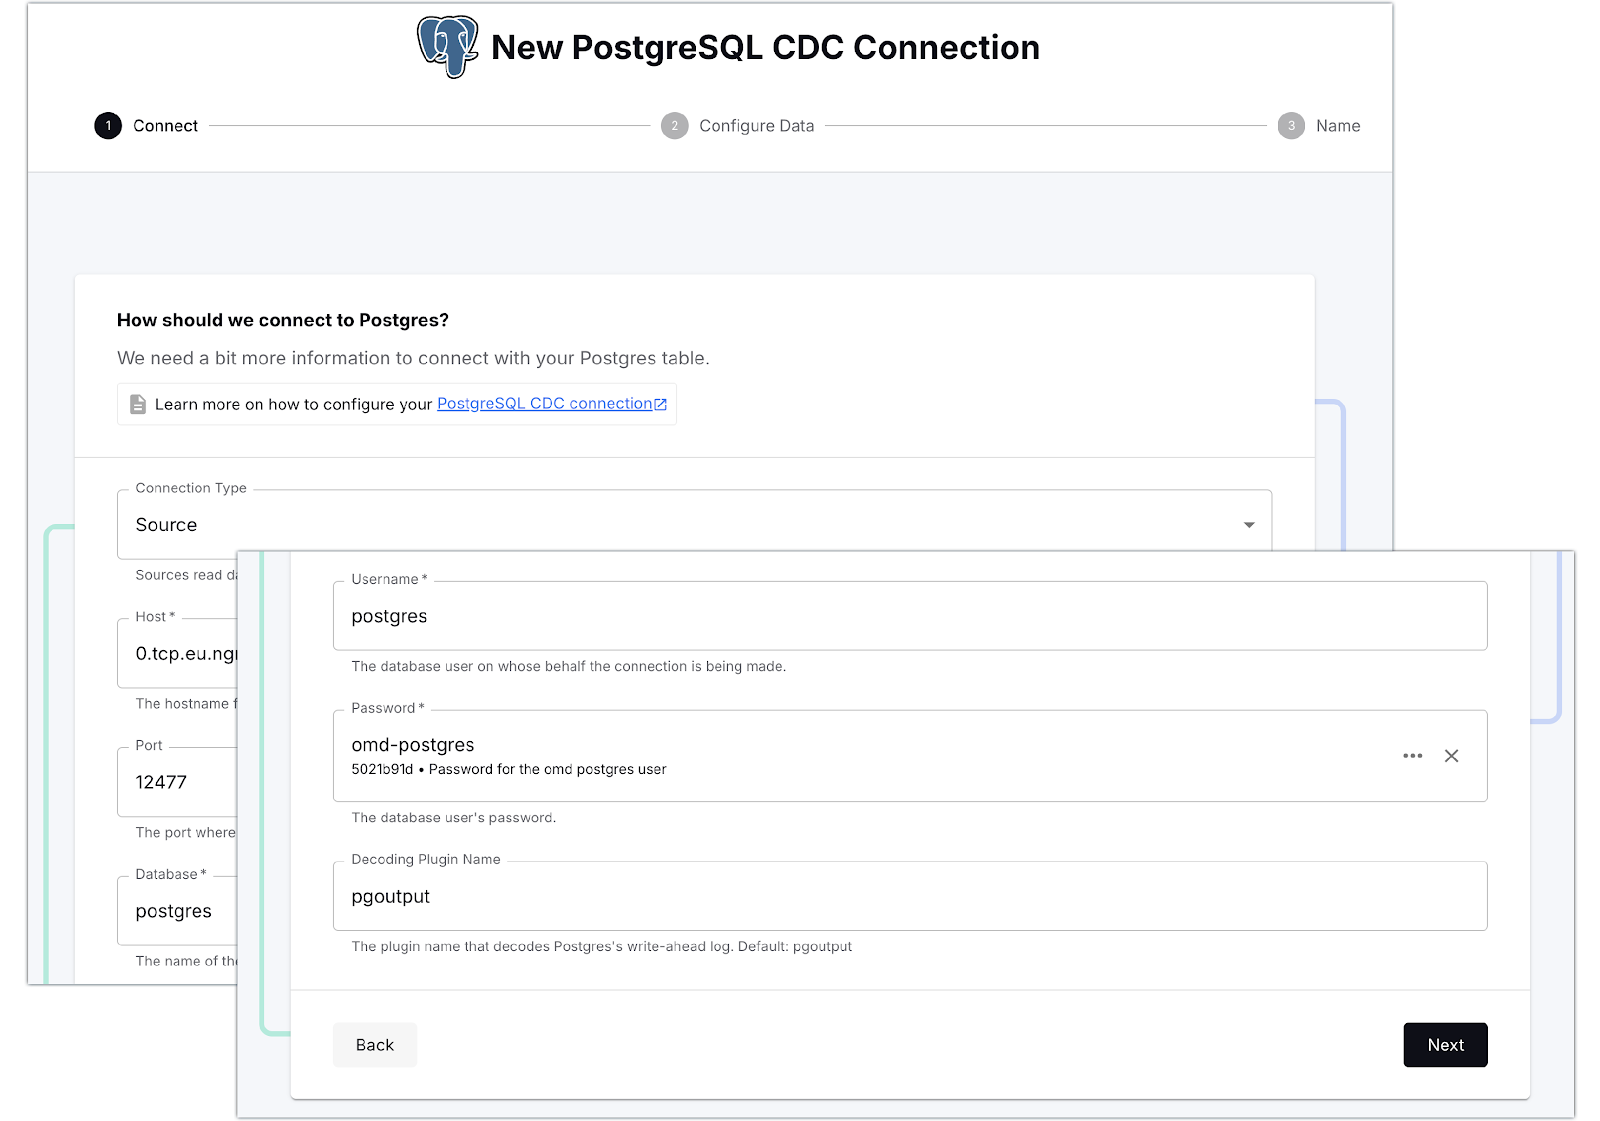
All set! Now we can go ahead and create our connection to Postgres.
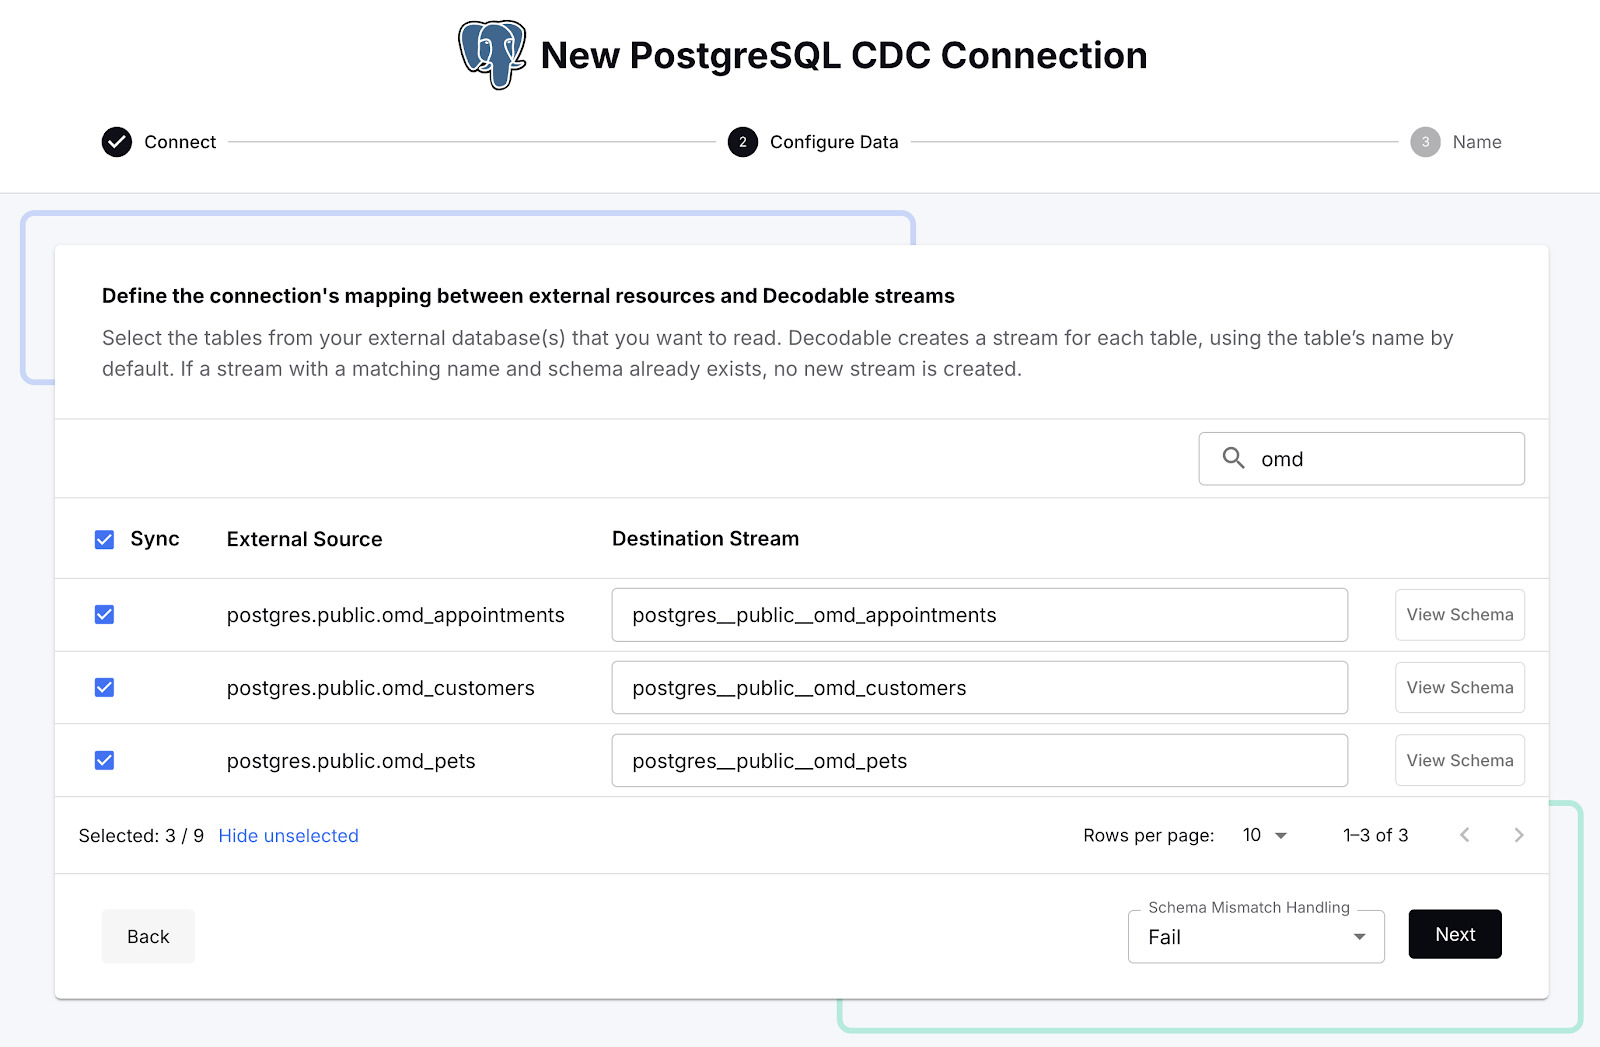
Once Decodable has connected to Postgres, it gives us a list of the available tables. There are quite a lot of tables in the database, and for our purpose we only want the Oh-My-Dawg (omd) ones, so let’s search for those and select them:
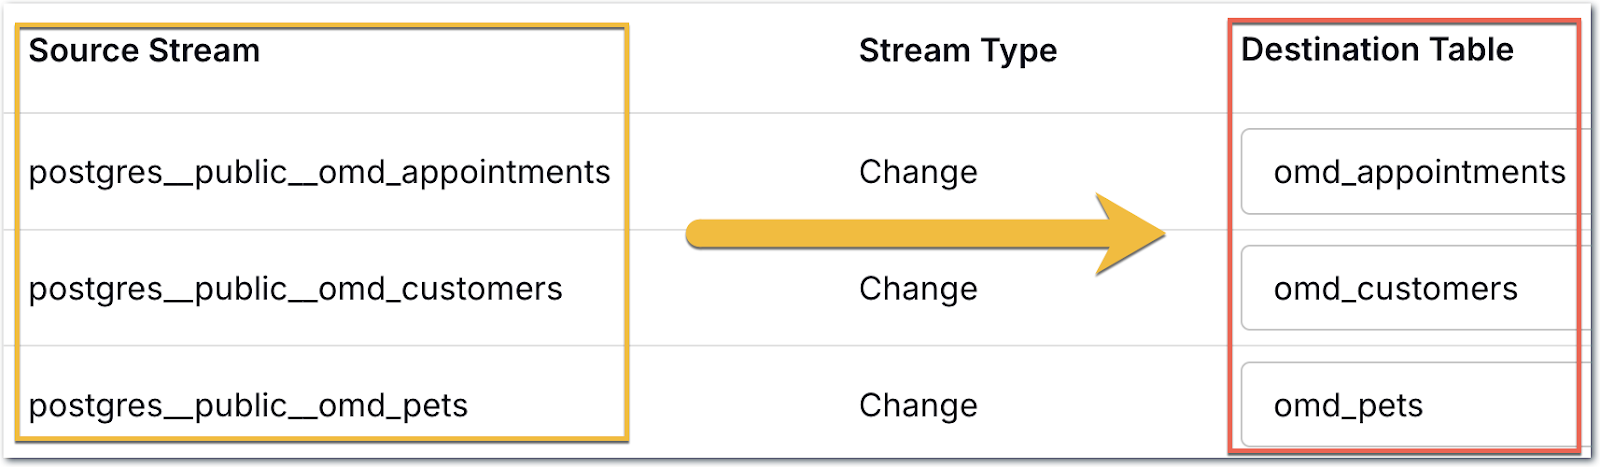
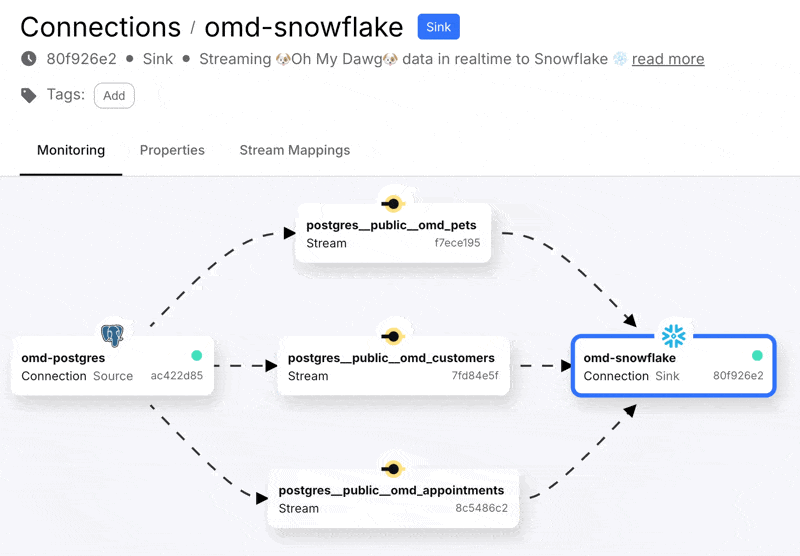
With that done we can create the connection, start it, and see in the Decodable console a nice visual representation of the three streams that are populated from the Postgres data that we selected. A stream in Decodable is a series of records similar in concept to a Kafka topic or Kinesis stream, and used to connect connectors and pipelines together:

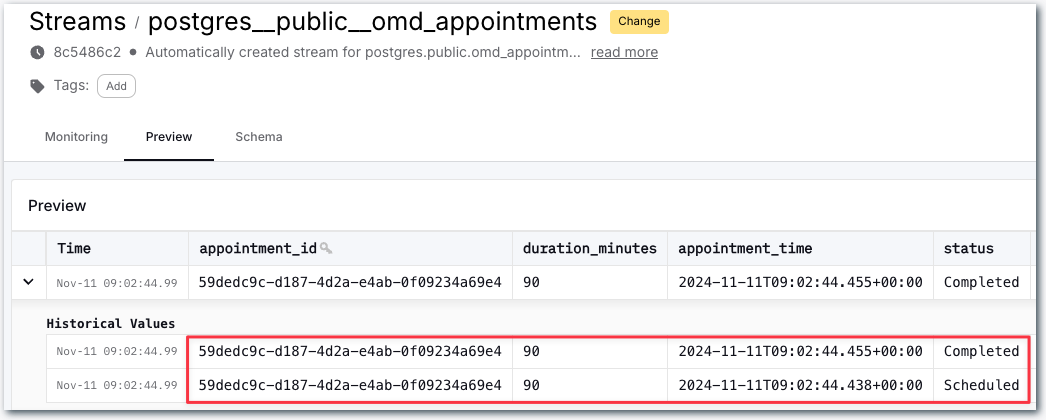
Clicking on one of these streams we can see the full snapshot of the data is in the stream, along with the changes as they happen.
Here’s a happy pooch who was first booked in for an appointment (Scheduled), and then attended the appointment (Completed):
OK, so that’s the data coming from Postgres. Let’s now see about sending it over to Snowflake.
Loading data into Snowflake 🔗
Configuring authentication 🔗
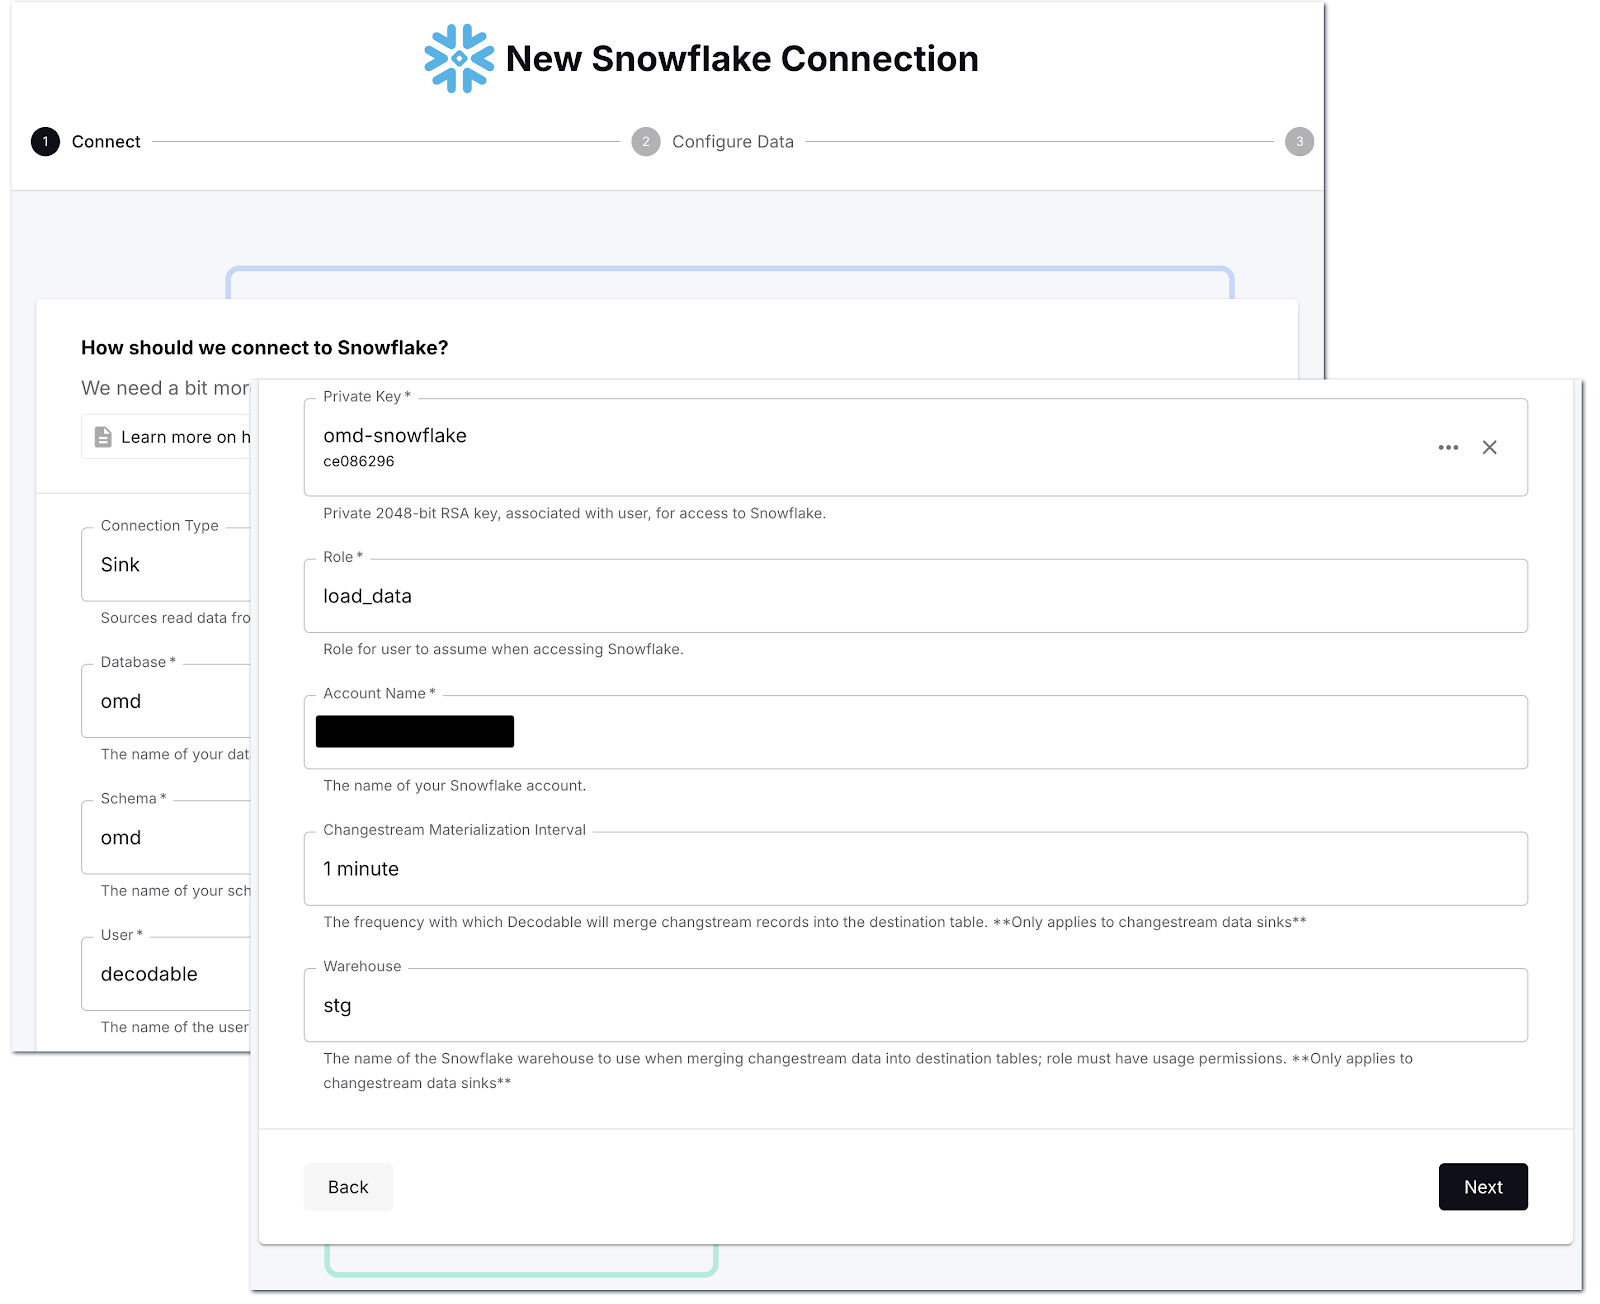
Similar to when we set up the Postgres connector, we need to store the authentication credentials for Snowflake as a Decodable secret before setting up the connector itself.
The documentation is comprehensive, so I’ll not cover all the details here. In short, we need to generate a new key pair so that Decodable can authenticate as our Snowflake user.
openssl genrsa 2048 | \
openssl pkcs8 -topk8 -v2 des3 -inform PEM -nocrypt -out rsa_key.p8 && \
openssl rsa -in rsa_key.p8 -pubout -out rsa_key.pub
This writes two files:
-
rsa_key.p8- the private key. This is the bit that we need to keep secure as it confirms us as being us. We’ll store that as a secret in Decodable. -
rsa_key.pub- the public key. This is not sensitive and we can give to anyone—in this case, it’s what we attach to the Snowflake user.
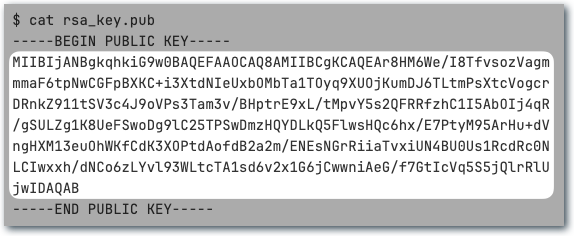
To attach the public key to the Snowflake user, you need to extract the raw key itself, without the header and footer:
Then in Snowflake run an ALTER USER like this:
USE ROLE securityadmin;
ALTER USER "DECODABLE" SET RSA_PUBLIC_KEY='
MIIBIjANBgkqhkiG9w0BAQEFAAOCAQ8AMIIBCgKCAQEAr8HM6We/I8TfvsozVagm
mmaF6tpNwCGFpBXKC+i3XtdNIeUxbOMbTa1TOyq9XUOjKumDJ6TLtmPsXtcVogcr
DRnkZ911tSV3c4J9oVPs3Tam3v/BHptrE9xL/tMpvY5s2QFRRfzhC1I5AbOIj4qR
/gSULZg1K8UeFSwoDg9lC25TPSwDmzHQYDLkQ5FlwsHQc6hx/E7PtyM95ArHu+dV
ngHXM13euOhWKfCdK3XOPtdAofdB2a2m/ENEsNGrRiiaTvxiUN4BU0Us1RcdRc0N
LCIwxxh/dNCo6zLYvl93WLtcTA1sd6v2x1G6jCwwniAeG/f7GtIcVq5S5jQlrRlU
jwIDAQAB
';
The DECODABLE user has just an arbitrary name; you can use an existing user if that suits your organization’s standards, or create a new one dedicated for this sink.
Check the rest of the connector documentation for the additional authorisations that need configuring in Snowflake.
Now let’s add the private key to Decodable as a secret. The process is the same as when we set up the Postgres password above. As before, make sure you are only using the key itself and not the header or footer:

Creating the Snowflake connector 🔗
Now all that remains is to create the sink connector to send the data we’re ingesting from Postgres to Snowflake. First off we define the connection details, including the name of the secret that we created to hold the private key:
Then we select which streams we want to send to Snowflake—as before, there’s a search box to help us narrow it down so we can select just the ones that we want.
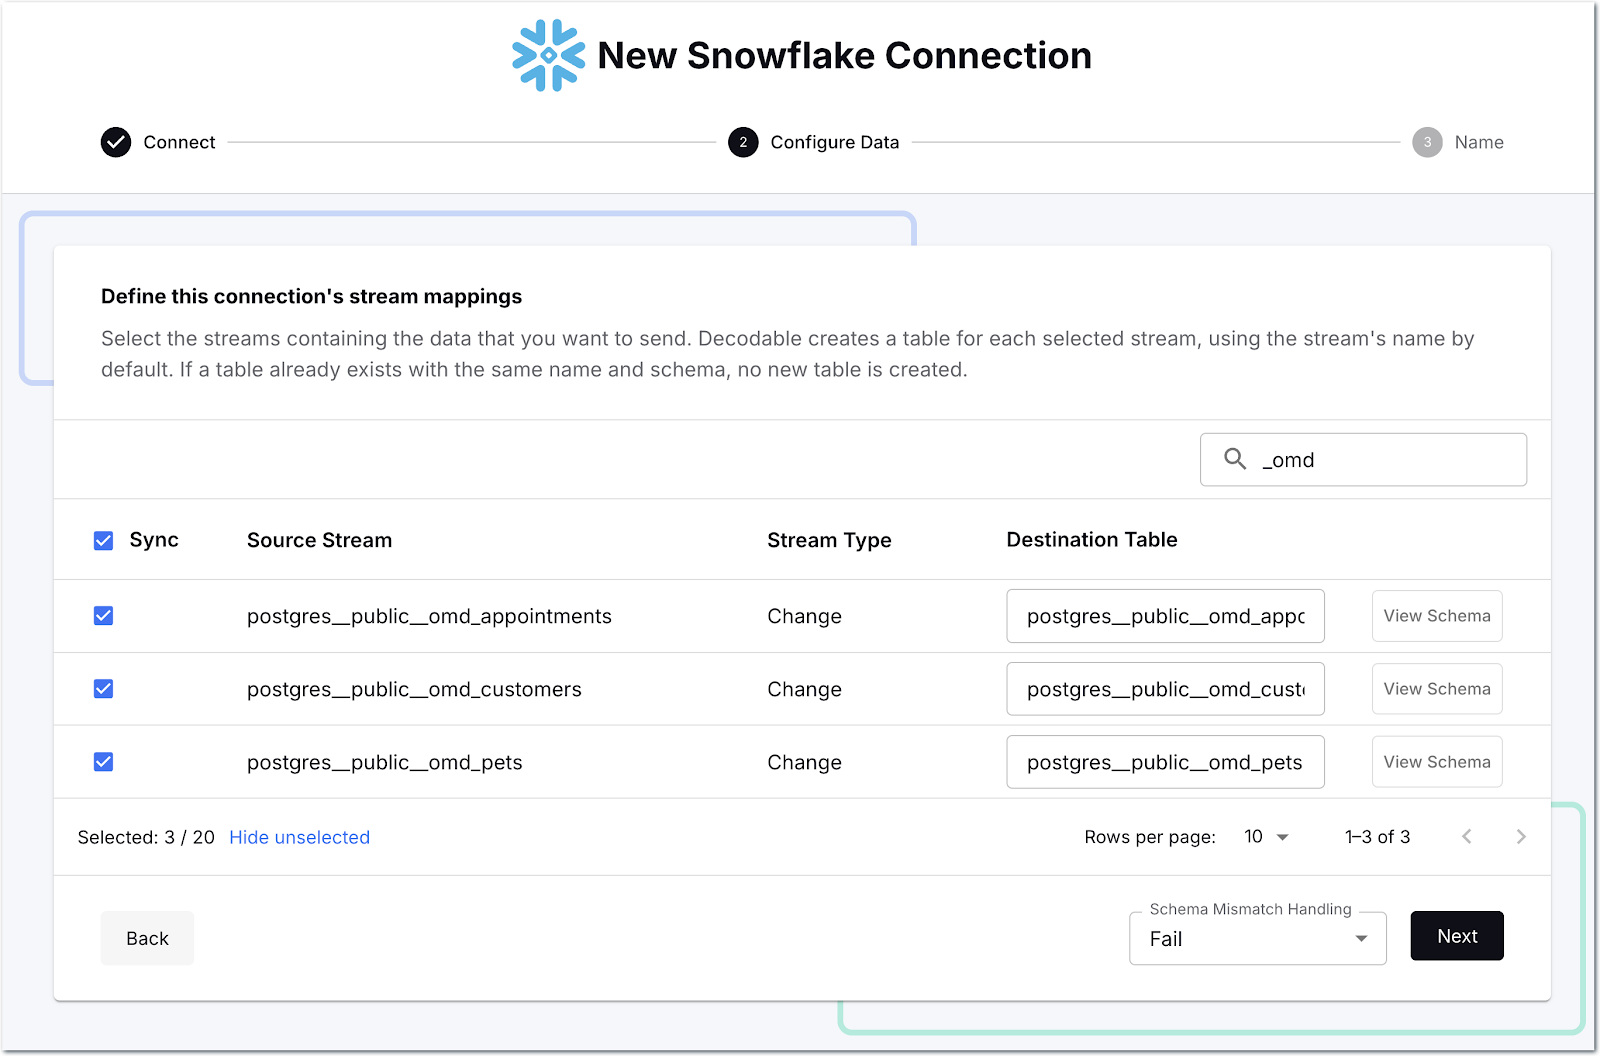
One thing you can change if you want is the name of the target table; since there’s a bunch of Postgres namespace stuff in there, I’m going to tidy it up a bit:
The connector will create the table for me in Snowflake since they don’t exist already. Now we start the connection, and off it goes!
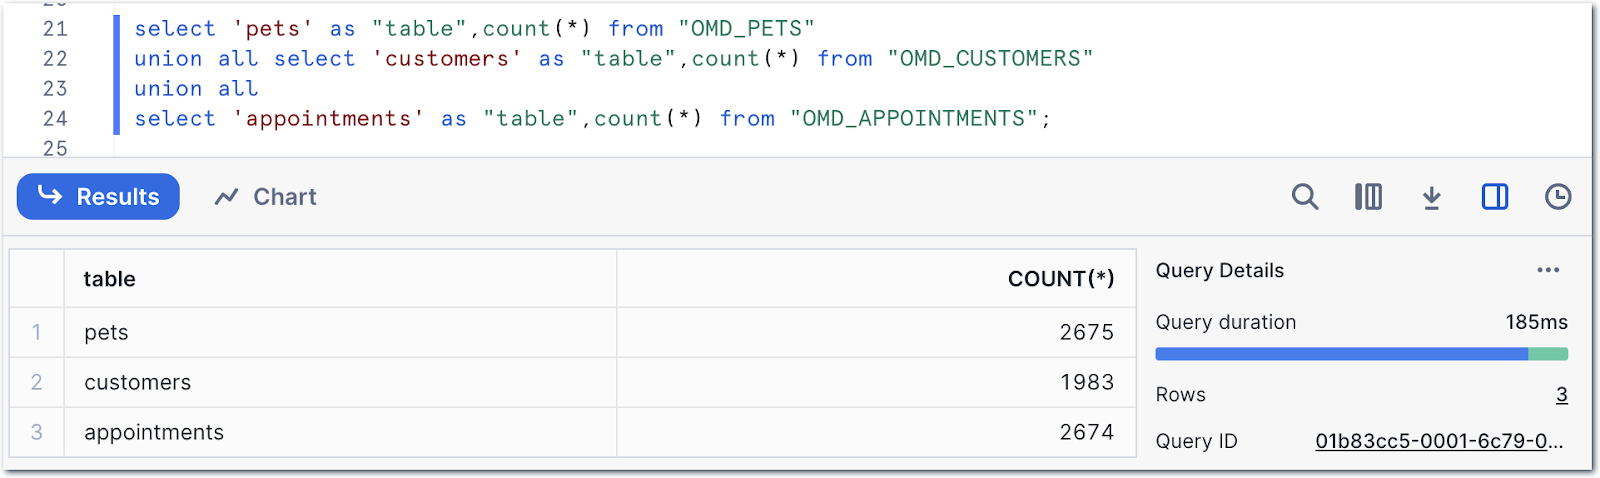
Heading over to Snowflake we can see we’ve got data:
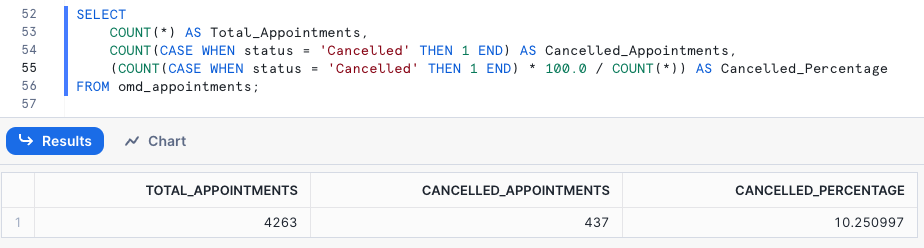
Referring to the data model at the top of the post, we can construct a query to start to denormalise the data:
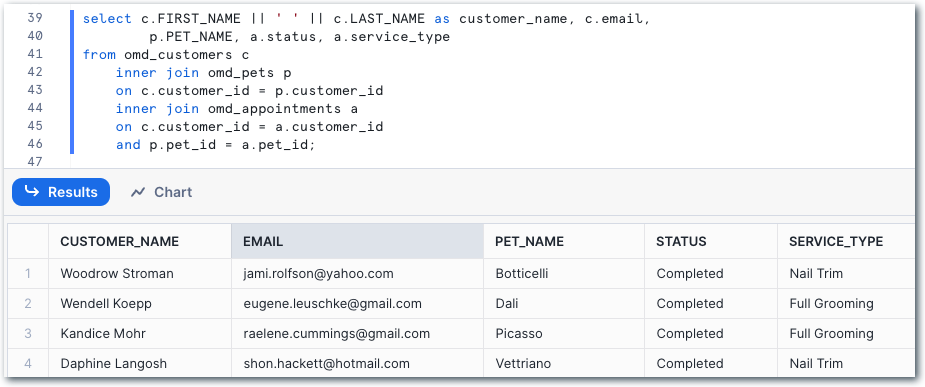
and build analytical queries on it, such as looking at the proportion of appointments that get canceled:
or which customer has canceled appointments the most:

Let’s do the same thing, but declaratively 🔗
If the mouse, or trackpad, is your thing, look away now. If, on the other hand, nothing gets you more excited than the idea of a keyboard, a CLI, and a git repository, then this section is for YOU.
Declarative resource management in Decodable will be familiar to anyone who has worked with tools such as Terraform. Instead of giving a set of imperative instructions (“Do this!”, “Create this!”, “Change this!”) you declare how things should look, and the declarative process then makes it so.

What this means in the context of Decodable is that we can build a set of YAML documents that describe the resources that we created above (two secrets, two connectors, three streams), and then run a command to make sure that our Decodable account reflects this. If it doesn’t, it’s updated by the declarative process until it is. This is perfect for things like putting your data pipelines into source control, as well as automating deployments .
To start off, we’ll create YAML documents that describe the secrets. Whether you create one YAML file for everything, one per resource, or somewhere in between (e.g. one per set of secrets, or per pipeline) is entirely up to you. Here I’ll create one per resource just to make it clear. Note that embedding secret values like this in plain text is not a great idea—better is to provide the value as a file (which could be populated from your organization’s secrets manager) or an environment variable.
The Postgres secret looks like this:
---
kind: secret
metadata:
  name: omd-postgres
spec_version: v1
spec:
  value_literal: Welcome123
Whilst the Snowflake one is a bit more complex because of the private key (don’t bother trying to hack into my Snowflake account, this is not my actual key 😉):
---
kind: secret
metadata:
  name: omd-snowflake
spec_version: v1
spec:
  value_literal: |
    MIIEvAIBADANBgkqhkiG9w0BAQEFAASCBKYwggSiAgEAAoIBAQChdeAhINX2/Q+0
    YkF+45es8sootZHq+nPUNL/9IXaEDasFwAi/w0sjGbjzJE9a2qTIzSoqyRQPob0H
    ufu7RZUrF5zV0ga0dZSXn+QGSm7jZDy21tzGCn8it7xstDB3ROjThOPxwjP8TqWa
    ytvO0XcSFwn6pVK+MUUqHtPp5E0b8OXb4FHVvCQGihpobM13KiVgjmN/jgw6loMD
    […]
    5io5kmFVae7r25YO5XoU7EBp1q1zIT+UScbySCLcAdX3o7j8FmFZBs5hsBLb0voB
    McOx/+kPJYb2Hzqs5ycjTQ==
Declarative resource management in Decodable is provided by commands under the Decodable CLI - primarily decodable apply and decodable query.
Let’s use the first of these to make sure the secrets we’ve defined are present and up to date.
$ ls -l *.yaml
-rw-r--r--@ 1 rmoff  staff    92  8 Nov 17:32 pg-secret.yaml
-rw-r--r--@ 1 rmoff  staff  1846  8 Nov 15:44 sf-secret.yaml

$ decodable apply *-secret.yaml
---
kind: secret
name: omd-pg
id: ee94bd72
result: created
---
kind: secret
name: omd-snowflake
id: ce086296
result: created
• Wrote plaintext values for secret IDs: [ce086296 ee94bd72]
Now we can create the YAML resource definitions for the Postgres and Snowflake connections.
We could write the YAML by hand.
But who has time for that?
Wouldn’t it be nice if we could find out the data that’s available and generate the resource definition from that instead?
That’s where decodable connection scan comes in.
We pass it the details of the connection that we want to create (name, type, host, etc.), as well as information about which tables we want (--include-pattern), and finally what the target should be called (--output-resource-name-template).
The -02 suffix is just to show things here and keep it separate from the web-based approach earlier.
$ decodable connection scan \
          --name oh-my-dawg-pg-02 \
          --connector postgres-cdc \
          --type source \
          --prop hostname=my.postgres.host.com \
          --prop port=5432 \
          --prop database-name=postgres \
          --prop username=postgres \
          --prop password=$(decodable query --name omd-postgres --kind secret --keep-ids | yq '.metadata.id') \
          --include-pattern schema-name=public \
          --output-resource-name-template stream-name="{table-name}-02" \
          > omd-pg.yaml
Notice how the password property is passed by reference to the omd-postgres secret that was created above using command substitution.
You don’t have to do this—you could also specify it directly.
Out of this scan command comes a nice set of YAML, describing the connection and its schemas:
---
kind: connection
metadata:
    name: oh-my-dawg-pg-02
spec_version: v1
spec:
    connector: postgres-cdc
    properties:
        database-name: postgres
        hostname: my.postgres.host.com
    stream_mappings:
        - stream_name: omd_appointments-02
          external_resource_specifier:
            table-name: omd_appointments
        - stream_name: omd_customers-02
          external_resource_specifier:
            table-name: omd_customers
        - stream_name: omd_pets-02
          external_resource_specifier:
            table-name: omd_pets
[…]
We could make changes here to tweak things if needed, but let’s go ahead and apply this:
$ decodable apply omd-pg.yaml

---
kind: connection
name: oh-my-dawg-pg-02
id: fd98e89d
result: created
---
kind: stream
name: omd_appointments-02
id: b62f1f50
result: created
---
kind: stream
name: omd_customers-02
id: 2b365c13
result: created
---
kind: stream
name: omd_pets-02
id: 5dd20920
result: created
Now we’ve created the connection. But what if we realize we missed something, such as including a description for the connection? This is what the relevant section of the YAML looks like:
---
kind: connection
metadata:
    name: oh-my-dawg-pg-02
    description: ""
[…]
To make the change to the connection all we need to do is update the YAML file:
---
kind: connection
metadata:
    name: declarative-oh-my-dawg-pg
    description: "An example of using declarative resource management to build data pipelines"
[…]
and then apply it again. Declarative resource management compares the file to the current state and makes the needed changes. This is a lot nicer than the regular drop/create route that you’d need to go if you were doing things imperatively.
Note here how only the connection has result: updated — the resources that didn’t change (the streams) are result: unchanged.
$ decodable apply omd-pg.yaml

---
kind: connection
name: oh-my-dawg-pg-02
id: fd98e89d
result: updated
---
kind: stream
name: omd_appointments-02
id: b62f1f50
result: unchanged
---
kind: stream
name: omd_customers-02
id: 2b365c13
result: unchanged
---
kind: stream
name: omd_pets-02
id: 5dd20920
result: unchanged
Let’s check that the description of the connection is now as expected:
$ decodable query --name oh-my-dawg-pg-02 --metadata-only

---
kind: connection
metadata:
    name: oh-my-dawg-pg-02
    description: An example of using declarative resource management to build data pipelines
Having created the connection, we need to activate it. It’s actually possible to specify in the YAML that the connection should be active , but certainly whilst we’re finding our way, decoupling the creation from activation is useful._ _To activate it, we run:
$ decodable query --name oh-my-dawg-pg-02 \
                  --operation activate \
                  --stabilize

---
kind: connection
name: oh-my-dawg-pg-02
id: fd98e89d
result: activated

🔘️ STARTING   • connection fd98e89d oh-my-dawg-pg-02
........................................
✅️ RUNNING    • connection fd98e89d oh-my-dawg-pg-02
🏁 ••• All queried resources stable ••• 🏁
Now let’s create the Snowflake connection. As before, we’re going to have Decodable generate the YAML for us, with all we need to do being to specify the connection details.
$ decodable connection scan \
          --name oh-my-dawg-snowflake-02 \
          --connector snowflake \
          --type sink \
          --prop snowflake.database=omd          \
          --prop snowflake.schema=omd          \
          --prop snowflake.user=decodable          \
          --prop snowflake.private-key=$(decodable query --name omd-snowflake --kind secret --keep-ids | yq '.metadata.id')          \
          --prop snowflake.role=load_data          \
          --prop snowflake.account-name=MYORG-MYACCOUNTNAME          \
          --prop snowflake.warehouse=stg          \
          --prop snowflake.merge-interval="1 minute" \
          --include-pattern stream-name='^omd\_.*-02$' \
          | decodable apply -
This time we’re not going to write it to an intermediate YAML file to then run through decodable apply, but just pipe it directly in.
It’s up to you if you want to do this.
For scratching around in development I find it’s quicker (and you can always get the YAML at a later date with decodable query).
You may prefer to write it to a file for visibility of what’s being run and any troubleshooting.
With the above run, we get a connection writing to three Snowflake tables created:
---
kind: connection
name: oh-my-dawg-snowflake-02
id: 957714a0
result: created
---
specifier:
    snowflake.table: omd_appointments-02
result: SUCCESS
---
specifier:
    snowflake.table: omd_customers-02
result: SUCCESS
---
specifier:
    snowflake.table: omd_pets-02
result: SUCCESS
So let’s activate the connection:
$ decodable query --name oh-my-dawg-snowflake-02 -X activate --stabilize

---
kind: connection
name: oh-my-dawg-snowflake-02
id: 957714a0
result: activated

🔘️ STARTING   • connection 957714a0 oh-my-dawg-snowflake-02
........................................
✅️ RUNNING    • connection 957714a0 oh-my-dawg-snowflake-02
🏁 ••• All queried resources stable ••• 🏁
And now we have data in Snowflake!
$ snow sql -q "select count(*) from \"OMD_APPOINTMENTS-02\"" \
        -x --account $SNOWFLAKE_ACCOUNT --user rmoff --password $SNOWFLAKE_PW \
        --database omd --schema omd

WARNING! Using --password via the CLI is insecure. Use environment variables instead.
select count(*) from "OMD_APPOINTMENTS-02"
+----------+
| COUNT(*) |
|----------|
| 9256     |
+----------+
Should you use a web interface or the declarative approach? 🔗

A pattern that we see users commonly adopting is that they’ll prototype and build pipelines in the web interface.
Once they’ve tested them and ironed out any wrinkles, they then export these to YAML (using decodable query) and use them declaratively from there on, through staging environments and on into production.
Decodable supports workflows in GitHub for exactly this approach.
You can take it a step further and consider generating YAML resource files from a template driven with a tool like Jsonnet .
Summary 🔗
Getting data from Postgres into Snowflake needs not be hard work 😀. With Decodable and its comprehensive library of connectors you can get data from one system to another in a scalable, low-latency way.
In this post I showed two ways of creating this pipeline; using the web interface and using a YAML-based declarative approach. Both achieve the same result of a CDC connection to Postgres sending an initial full snapshot of the data followed by all subsequent changes to the data to Snowflake. With the data in Snowflake, we can perform whatever analytics on it that we want.
But Decodable is not just connectors, it also offers a powerful processing layer built on Flink SQL. With this, you could take the streams of data from Postgres and apply transformations before they’re written to Snowflake. For example, performing the denormalisation across the three source tables to then write One Big Table (OBT) to Snowflake, thus avoiding any need for subsequent pre-processing before analytical queries can be run.
You can find the source code used for the Postgres example, and sample YAML resource definitions, on GitHub .