
Antora is a modern documentation site generator with many nice features including sourcing documentation content from one or more separate git repositories. This means that your docs can be kept under source control (yay 🎉) and in sync with the code of the product that they are documenting (double yay 🎉🎉).
As you would expect for a documentation tool, the Antora documentation is thorough but there was one sharp edge involving GitHub that caught me out which I’ll detail here.
Overview 🔗
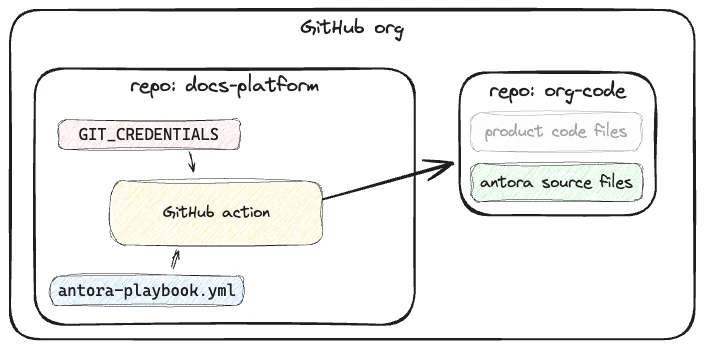
I’ve got two git repositories in GitHub, under the same organisation. Both are private. One holds the Antora configuration including the list of content sources which includes source files in the second repository.

Building Antora using a GitHub Action 🔗
The Antora docs show how to publish to GitHub Pages. I’ve modified this slightly to work with Cloudflare Pages (of which more below), but the salient steps are as follows:
[…]
    steps:
    - name: Checkout repository
      uses: actions/checkout@v4
    - name: Install Node.js
      uses: actions/setup-node@v4
      with:
        node-version: '18'
    - name: Install Antora with the Antora Lunr Extension
      run: npm i antora @antora/lunr-extension
    - name: Generate Site
      run: npx antora antora-playbook.yml
[…]
That is:
- Checkout the current repository (i.e.
docs-platform). An important point to note is that this holds the Antora configuration but not the documentation source files themselves - Install node.js and lunr-extension
- Generate the site. It’s at this point that Antora is run, reads the
antora-playbook.ymlconfiguration, and goes to fetch the documentation source files.
Accessing a private GitHub repository from Antora on GitHub Actions 🔗
Again, the Antora docs discuss how to handle private repository authentication. Because the docs are based around git and not GitHub specifically there is a bit of groking to do if you’re working with GitHub but it boils down to:
- You could use your GitHub credentials (username/password) but this would be a really bad security practice, and also not even possible if you’ve got two-factor authentication (2FA) enabled (which you really should have).
- You should use a personal access token (PAT).
NOTE: per the docs you cannot use deploy tokens or keys on GitHub:
- Deploy keys cannot be used with Antora since they require the use of SSH authentication, which the git client in Antora does not support.
- GitHub does not support deploy tokens at this time [December 2023 / Antora 3.1]
Types of PAT 🔗
GitHub has two types of PAT
- Classic
- Fine-grained
Fine-grained PATs were announced in October 2022 and are marked as beta in the UI. However, they are necessary to use, as I eventually found out. This is because an organisation can be configured to block the use of classic PATs, but the message that Antora returns when it is blocked doesn’t explain this, hence writing this blog :)
GitHub Authentication and Authorization error messages with Antora 🔗
When Antora builds a site and pulls in content from a git repository it will throw an error if it hits a problem, but unfortunately not always surface the full reponse from the server. One way to test your PAT is going to work (and rule it out as a problem when other bits of the GitHub Actions pipeline don’t work!) is using curl:
curl  -w "\n\nHTTP code: %{http_code}\n" -s -L \
      -H "Authorization: Bearer $PAT" \
      https://api.github.com/repos/$ORG/$REPO/contents/
(replace $PAT, $ORG, REPO accordingly)
This gives you both the response, and the HTTP code.
In conjunction with this you can hardcode the credentials into the antora-playbook.yml (WHICH IS A REALLY BAD IDEA M’KAY) just for testing as this helps to avoid any complications with environment variables (which we get into later), like this:
content:
  sources:
   - url: https://my_pat_goes_here:@github.com/my_org/my_repo.git
Note the trailing : after the PAT and before the @.
I used this to iterate over different permutations below to figure out quite what was going on.
❌ Invalid Token 🔗
- HTTP code: 401
- HTTP response message:
Bad credentials - Antora message:
FATAL (antora): Content repository not found or credentials were rejected
To fix this one you need to generate a valid PAT. Also make sure that you’re configuring it in the correct format with a trailing : after the PAT and before the @:
https://my_pat_goes_here:@github.com
❌ Valid Token, Invalid Permissions 🔗
This is the problem that I hit. My PAT was valid—I check literally a gazillion times—but still the Antora build failed.
- HTTP code: 403
- HTTP response message:
`my_org` forbids access via a personal access token (classic). Please use a GitHub App, OAuth App, or a personal access token with fine-grained permissions. - Antora message:
FATAL (antora): HTTP Error: 403 Forbidden
As the HTTP reponse message tells me, I’m using a “classic” PAT, and the GitHub org whose repo I’m trying to access prohibits this. Looking at the Antora message this is literally true (403 Forbidden) but if you’re not clued up on the nuances of PATs may well escape you (it had me scratching my head for several hours).
✅ Valid Token, Valid Permissions 🔗
This is what we’re aiming for - a valid token, which has the necessary permissions to access the repository.
- HTTP code: 200
- Antora message: Site generation complete!
To create a fine-grained PAT go to your GitHub’s account Settings -> Developer settings -> Personal access tokens -> Fine-grained tokens. Specify the organisation’s repository that Antora needs to access, and add Read access to code and metadata for permissions. Depending on your organisations settings, you may need to get the org owner to grant the PAT request before you can use it.
Using PATs with GitHub Actions and Antora 🔗
So…we’ve now got a valid PAT with the necessary permissions. Let’s finish this up by making the PAT available in a secure way to the GitHub Action. As noted above, hardcoding credentials into your antora-playbook.yml is a horrible idea (and the docs tell you this very clearly too), so we’ll remove them and just reference the repository’s bare URL:
content:
  sources:
   - url: https://github.com/my_org/my_repo.git
To make the credentials available to Antora we make use of the GIT_CREDENTIALS environment variable which Antora will automagically use if it’s available.
In the repository under which the Antora build GitHub Action will be running (docs-platform in the example I’m using here) add a Repository secret called GIT_CREDENTIALS:
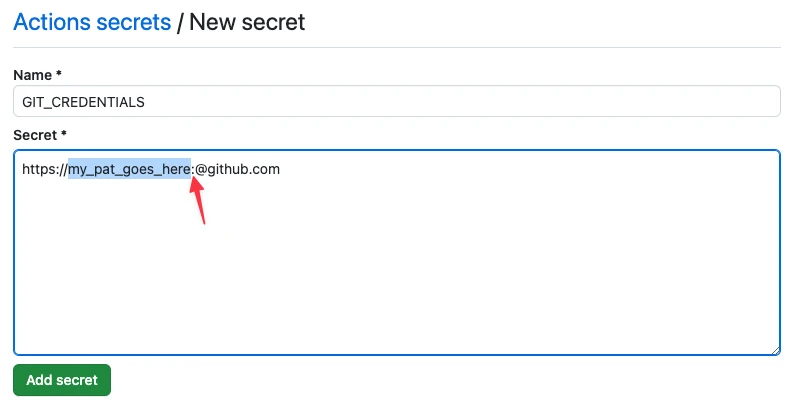
With that repository secret set you can now access it from your GitHub Action workflow with the env key:
    env:
      GIT_CREDENTIALS: ${{ secrets.GIT_CREDENTIALS }}
Building and Deploying Antora to Cloudflare Pages 🔗
Once you’ve built your docs site with Antora you need somewhere to host it. For various reasons I’m trying out Cloudflare Pages (in part because of the support for preview deployments which GitHub Pages doesn’t currently have).
You can use the cloudflare/pages-action GitHub Action to publish the built site to CloudFlare Pages. Here’s my complete workflow:
name: Publish to Cloudflare
on:
  push:
    branches: [main]
  # Allows you to run this workflow manually from the Actions tab
  workflow_dispatch:
jobs:
  build:
    runs-on: ubuntu-latest
    env:
      GIT_CREDENTIALS: ${{ secrets.GIT_CREDENTIALS }}
    steps:
    - name: Checkout repository
      uses: actions/checkout@v4
    - name: Install Node.js
      uses: actions/setup-node@v4
      with:
        node-version: '18'
    - name: Install Antora with the Antora Lunr Extension
      run: npm i antora @antora/lunr-extension
    - name: Generate Site
      run: npx antora antora-playbook.yml
    - name: Publish to Cloudflare Pages
      uses: cloudflare/pages-action@v1
      with:
        apiToken: ${{ secrets.CLOUDFLARE_API_TOKEN }}
        accountId: my_account_id
        projectName: my_cf_project
        directory: build/site
        gitHubToken: ${{ secrets.GITHUB_TOKEN }}
Note that you need to add CLOUDFLARE_API_TOKEN as a repository secret too. GITHUB_TOKEN is a special secret which is automagically created, and therefore you don’t need to add it.